Friday, December 16, 2016

GIT Software Versioning

In this edition of  JVL blog, we will look into Git Versioning basics.

As programming projects become inevitably complex and extensive, it is imperative and also logical to keep control of your source code while being able to work in a collaborative team. Sometimes even keeping track of changes in your own source files becomes a very difficult task as the project scales. Then imagine having to work with a team of 3 or more people! It becomes hardly manageable. Software Versioning tools such as SVN, Git, ClearCase, Mercurial exist to help alleviate this problem.

Of the mentioned examples, I have had experience with SVN and Git, which are both quite similar, and Clearcase, which is a very powerful source control tool more suitable for very large-scale projects. As I prefer Git, I will be writing about it.


An Introduction to Git

Git is an open-source source code versioning utility that is both powerful and quite easy to learn. Despite its intended use for software source codes, Git could be similarly used to version control any project that handles files such as VHDL (Very High-Speed Hardware Description Language) projects, circuit schematics, graphics designs, documentations, etc... It is sub-optimal to handle graphics with Git, because the information contained is not text-based. Nonetheless, taking snapshots of graphics is equally possible with Git. Many GUI programs exist for Git, but I will be focusing entirely on working with Git in the command lines (either under Linux or Windows).

The idea of versioning control of Git is creating snapshots of your source codes during the span of the project and storing those snapshots into repositories, which could be locally saved or hosted by providers like Github, BitBucket, and Gitlab. The snapshots contain the state of the different files at the moment the snapshot was taken. In other words, it saves the changes of the files up to the point the snapshot was taken. Of course, the user can specify which files to keep track of by Git. These snapshots, or in Git's lexicon commits, could be later examined, retrieved, reused, deleted....


Getting Started

I will not go into the details of Git installation nor account setup in a Git repositories-hosting provider. The intention is to recommend a good tool for all programmers or creators in general and getting started with the basics.

The basic, general workflow is shown as follows:


Figure 1. Git Versioning Basic Workflow

1. Starting a Repository


The way I prefer to do it is to first log in into my repository-hosting provider (BitBucket) and create a repository from there, as shown below:


Figure 2. Creating Repository in Bitbucket

Then copy the address of the repository to the clipboard.


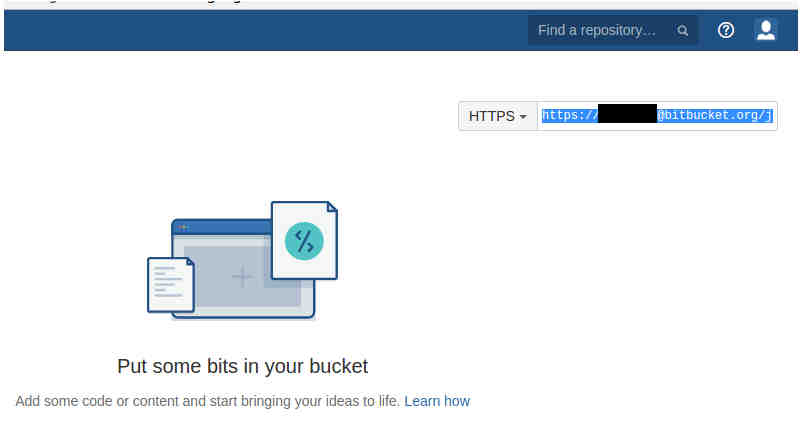
Figure 3. Copying the Repository Address to your Clipboard

Open a terminal, navigate to your desired location, and clone the repository locally with the "git clone" command.

Figure 4. Cloning the Repository from the Hosting Provider

2. Making Changes

Basically, just work on your project by adding or modifying files. In my example, I copies two files into our project's folder.


Figure 5. Copying two Files into the Project Folder.

Bonus: use "git status" to view the current repository changes. I use this a lot; sometimes I think way too often.


Figure 6. Viewing the Status of the Repository
The RED filenames are files that have been modified or added in your project, but not yet staged for commit, or in other words, saving a snapshot.


2. Staging Changes

Staging changes simply tells the program which files or changes to actually take a snapshot of. We do this by using "git add ." to stage all files to be committed. Instead of using "." to stage all files, one could specify individual files.

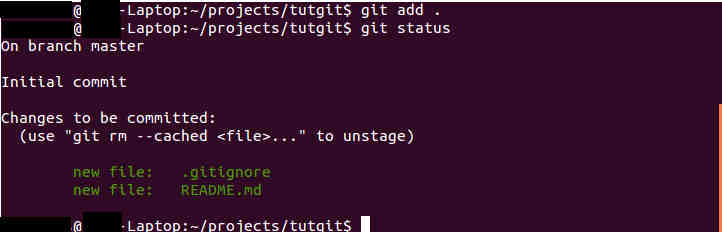
Figure 7. Staging Changes
Note that the "git status" now returns GREEN filenames as they are now staged and ready to be committed.


3. Confirming Changes

Committing is the same as taking a snapshot of current staged files. This is done with "git commit" command.

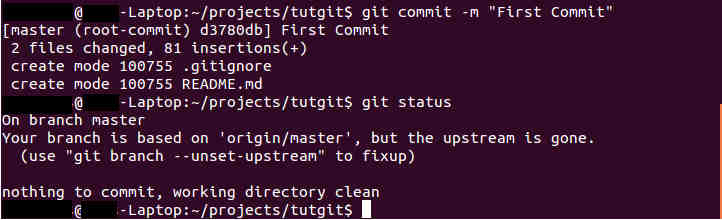
Figure 8. Committing Staged Changes
The "-m" option specifies a message between "" describing briefly the current snapshot, so to speak.

Bonus: use "git log" to view a history of your commits, or snapshots. The most recent commit is now visible in the log.

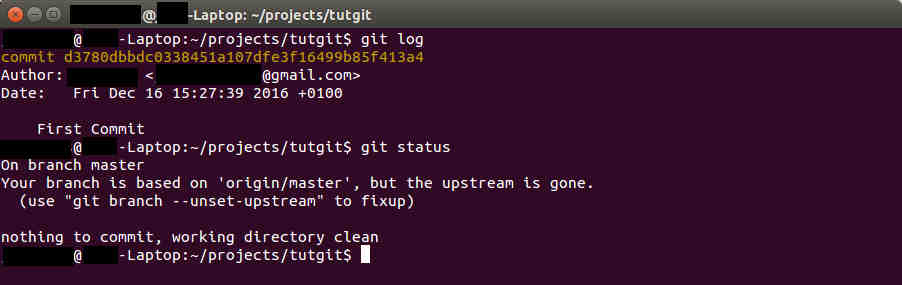
Figure 9. Viewing Commit History
4. Updating Server

Lastly, we have to "git push" so that the local changes are updated on the server.


Figure 10. Pushing Changes to the Server

If you encounter a message as shown in Figure 10 after issuing the "git push" command, then follow as it has been done in the same screenshot. Afterwards, you should be able to successfully push the changes. You might also be asked for credentials of your account with the repository hosting provider.

At this point, the steps just repeat in a cycle as was shown in Figure 1. This workflow can get you started just as essentials. Obviously, there are tons of other actions and features of Git that are not exposed here. From here on, you could seek some more advanced topics and features from Git. Google is your best friend, and the sky is the limit...


Conclusion

This post served ultimately to recommend a tool that would make your life much easier, and organized, regardless of whether you are a script writer, a web developer, graphics designer, or embedded software engineer. It also got you started with the basic workflow, its uses, and the benefits. For more Git tutorials, a Google search for "git tutorial" will be more than enough to find very instructive articles.

I hope this was as instructive as I had anticipated it to be and also hope that Git will make your life much easier and productive!


Sunday, December 4, 2016

Thesis on Convolutional Neural Network!

After a while of inactivity from blogging in the JVL blog, I finally got new material to post something relevant to the previous publication on Convolutional Neural Networks (CNN). The previous post presented a small literature review on CNN; this time I present a thesis project on the same topic.

If the material of the previous post caught your attention, then this thesis will certainly sparkle further interest. In trying to further strengthen my knowledge on CNN, I decided to take a thesis topic on Resource-aware CNN exploration on CPU-only implementations for image classification that was offered to me. This topic evidently offers that additional research and practical component that would well complement my acquired theoretical understanding. It offers a reinforcement to my learned skills. Furthermore, this project would enable me to work with different tools, libraries, and open-source projects related to machine learning and image processing. I was also looking forward to improving my coding skills in C++, especially when forking from open-source projects.

I must also say, I had quite a difficult time deciding between this CNN topic and another topic that I also found very interesting and was qualified for. The alternative was to work on a faster error correcting scheme for PUF's (Physically Unclonable Fnctions) and to implement the algorithm in an FPGA (Field Programmable Gate Array). This topic actually embodies many of my main interests: information theory, channel coding, scripting and simulations, VHDL implementation on FPGA's, and Embedded Security. As you could readily infer, it was quite a difficult choice to choose the CNN topic over this alternative.

The Thesis

The document presented here is the final document as a result of this project. This is put together with as much relevant details as possible with the purpose of making the experiment repeatable for the reader. Hopefully, the simulation benchmark results and some of the ideas exploration for reducing computation of the CNN algorithm may actually help others.


Closing lines...

After finishing this project, I feel substantially more competent in this area of machine learning. The research and exploration experience from this project gave me an opportunity to exercise as a research engineer, to benefit from and to contribute to open-source, and to compose a document that is useful to the reader, especially for sharing results and for repeating the experiment. The even more valuable take-away skills were the use of several Latex packages to produce a professional-looking documents and the improvement on coding skills and styles.

As is (generally) common to human nature, even after finishing my thesis, I still sometimes wonder "what if" I had taken the other route I described above. Where could that have taken me? What could have gone differently?


Sunday, May 29, 2016

Convolutional Neural Networks - Seminar

In this edition of the JVL blog, I want to present yet another small literature review, but this time on Convolutional Neural Networks (CNN) in the area of machine learning for image processing.

Similar to the previous post about Nanophotonics Interconnects, this write-up was also an obligatory part of my current masters program. This literature review on the topic of Convolutional Neural Networks gives an introductory knowledge about what neural networks are, how they are extended to be convolutional networks, and how they can be used for image processing and other applications.

Again, the requirements were similar to those of the document presented in the previous post: a brief 4 pages literature review about the topic. This serves as an extension to and further practice on understanding and writing scientific papers especially about a foreign topic. Writing a technical paper on a topic foreign to me was demanding as it required the extra effort to get acquainted with the fundamentals. Nonetheless, it was quite an interesting topic and a worthwhile task, and so I will like to share it here.


The Literature Review

The following document introduces fundamental concepts on and recollect my understanding of Convolutional Neural Networks. This is in NO WAY an officially published paper nor does it contain any new contributions from my part. It serves as a technical literature review and writing exercise.


Products that apply Deep Learning

If you wondered where and in what products you see artificial intelligence, then checkout the well-known Amazon products, Echo Dot (2nd Generation) or the Amazon Echo.


Lastly...

As was briefly mentioned, working on a topic that's different from one's own technical area of expertise does require more effort. I reckon CNN wasn't an easy topic to grasp at an instant, but once the fundamentals are there, the rest is basically just feeding to that curiosity. There are a plethora of resources out there, and there is much more being worked on as far as CNN is concerned (different applications, architecture, parameters, etc...).

If you are interested in the topic, I encourage you to look around for more resources and projects about CNN...Even try and play with some of the widely-known Machine Learning frameworks such as Caffe, Torch, Theano, mxNet, TensorFlow, DSSTNE...


As usual, leave a comment if you have one!


Monday, March 28, 2016

Nanophotonics Inteconnect - Literature Review

In this post of  JVL blog, I want to publish a small literature review in the area of Photonics Interconnects.

In partial fulfillment of one of my advanced topics course in IC (integrated circuits) Design during my current masters program, I had to write a small literature review on the topic of photonics interconnects. As it is usual for our advanced topics courses, the lecturer for this course was a guest professor from a foreign institution ( this case from UT Austin, my former alma mater). The guest lecturer was a leading expert in the area of IC Design and who is a researcher interested in nanometer VLSI physical design.

He has published few papers focusing on using nanophotonics, a fairly premature technology, as interconnects in nanometer integrated circuits. We were required to write a brief 4 pages literature review of about 4-5 papers on the topic. On the one hand, we gained some experience in reading and understanding very specific and complex scientific papers in trending research areas of IC Design. On the other hand, we were exposed to and gained practice on writing a technical paper. Although it was not required, I have done it in Latex, which is a compiled word processor very useful in any kind of write-ups. This has been proven very useful in academia.


The Literature Review

The following paper review posted here tries to summarize key concepts and my understanding of the different papers. This is in NO WAY an officially published paper nor does it contain any new contributions from my part. It serves as a technical writing exercise. As usual, leave a comment if you have one! 


And a few final words...

Although it was only a 4 pages write up, it does require a good understanding of the technically-dense and jargon-full scientific papers we had to read. And precisely because it was only 4 pages long, it was also a challenge to pack all the key points and concepts into a highly limited space and still make sense out of it.  

Although technical writing skills was heavily tested during my bachelors, reviewing such novel and complex scientific papers was not. It is worthwhile mentioning the importance of this exercise for future tasks as it paves the way for further interesting assignments...